How to Create a Budget in QuickBooks Online: Step-by-Step
Creating a budget that works can be challenging. Income can be unpredictable, and expenses can be hard to estimate. However, a well-crafted budget is essential for running a successful business. By using QuickBooks Online’s budgeting tools and following the steps below, you’ll gain a clear picture of your finances and be able to make informed decisions throughout the year.
Creating Your Budget
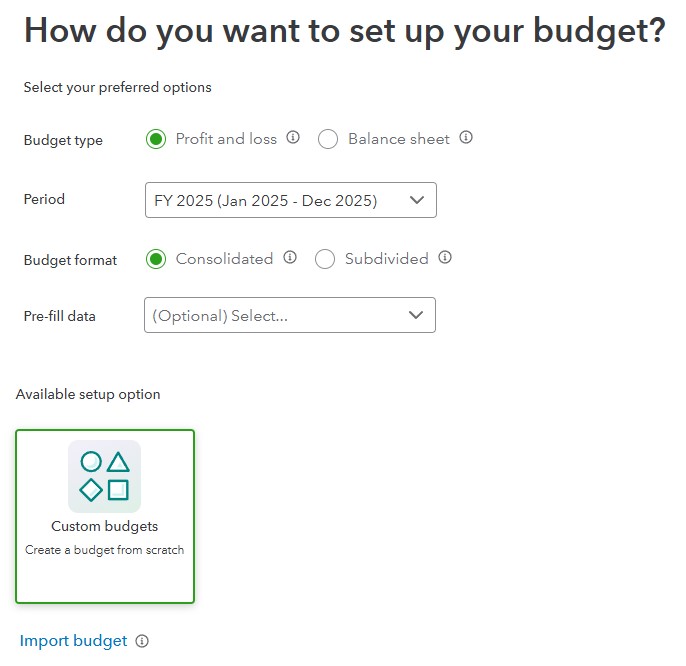
Click the gear icon in the upper right corner, then select Budgeting under Tools. Click Create budget. For Budget type, select Profit and Loss. This is most typical. It allows you to plan your budget around income and expenses over a specific time period.
***Note: you can also setup a budget for a Balance Sheet which can help you track your company’s assets, liabilities, and equity and plan for short- and long-term goals.
You’ll have to make other decisions about your new budget, such as:
- Time period. We’re going to create our budget for the upcoming fiscal year that starts in Jan of 2025. So, we’ll select FY 2025 (Jan 2025 – Dec 2025).
- What Budget format do you want to use? We’ll select Consolidated, since we want an organization-wide plan. A Subdivided budget would allow you to create individual budgets based on location, class, department, or customer.
- Do you want QuickBooks Online to pre-fill data? If so, select the year of actual data you’d like to use from the drop-down menu.
- Prefer to start from scratch? Select Custom budgets to manually enter your own data. This is especially helpful for new businesses with limited historical data or for companies revamping their finances.
- Already have a budget outside QuickBooks?Use the Import budget option to bring in your budget from Excel or Google Sheets.
For this article, we will set up a budget from scratch.

QuickBooks helps you prepare the budget you want.
Click Next when you’re done. Your budget table will open.
Filling In Your Budget
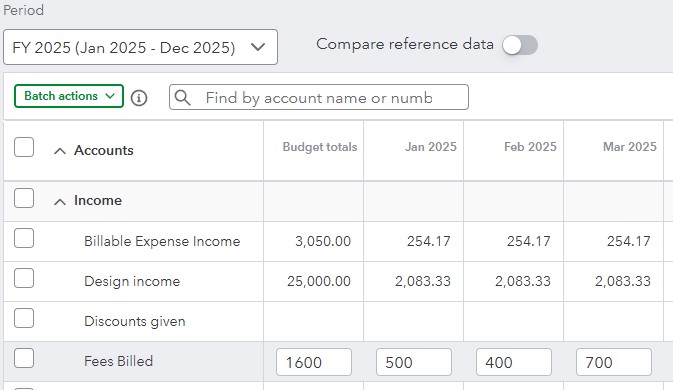
Before you start filling in your budget, make sure the information at the top of the page is accurate. Is the fiscal-year correct? The button in front of Compare reference data should be turned off, since we’re starting from scratch. If you have past budget data or a year’s worth of income and expenses that you want to bring in, make sure this option is turned on. QuickBooks Online will then ask you whether you want to transfer your Actuals (real money you received or spent) or your budget, and for what year.
Make sure the time span is set correctly for your initial work (Yearly, Quarterly, or Monthly), though you can switch back and forth among them without losing data. Click the gear icon in the upper right to see your options there. You can Autosave budget (recommended), Hide empty rows (you won’t want to do this until you have your budget set up), and make the Display density compact.
To create your budget, you simply enter numbers in the small boxes supplied. Columns are divided by months or quarters, depending on what you specified, and rows are labeled with budget items (Design Income, Fees Billed, Advertising, Legal & Professional Fees, etc.). You simply enter numbers in the boxes that apply. You can either:
- Enter an annual total in the Budget totals box and let QuickBooks Online divide it into 12 monthly numbers (click the small “split” icon), or,
- Put the monthly amount in the first month’s (or quarter’s) column, and QuickBooks Online will multiply it by 12 and enter the annual number (click the small arrow).
You can also enter different numbers in each box to reflect changing budget needs.

You can enter numbers manually in individual boxes or enter annual or monthly numbers. QuickBooks Online will divide or total them.
When you’re done working with your budget, save it. You can come back anytime and make adjustments as needed.
Budgeting Tips
- Remember seasonal upswings and downswings.
- Make your goals as realistic as possible and distinguish between essential and non-essential expenses. Enter your budget items for the bills and other expenses that must be covered before you add optional categories.
- Keep it simple. Don’t budget down to the last paper clip. You risk budget burnout.
- Build in some backup funding. Just as you’re supposed to have an emergency fund in your personal life, try to create one for your business.
- Plan for Periodic Expenses like annual insurance premiums, property taxes, or holiday gifts can catch you off guard. Estimate these costs and set aside money each month so you’re prepared.
- Overestimate your expenses, at least a little. This can help prevent “borrowing” from one budget category to make up for a shortfall in another.
- Make your employees part of the process. You shouldn’t be secretive about the expense element of your budget. Try to get input from staff in areas where they have knowledge.
- Revisit your budget frequently. You should evaluate your progress at least once a month. You’ll learn a lot about your spending and sales patterns that you can use for future periods. The Budget Overview report displays all of the data in your budget(s). Budget vs. Actuals shows you how you’re adhering to your budget.
- If you’re feeling unsure, working with an accounting professional can provide clarity. They can help you fine-tune your budget, offer insights into tax strategies, and suggest ways to make your money work more efficiently.
- Staying motivated can be tough so make sure you reward yourself and celebrate small victories along the way, like paying off a credit card or hitting a milestone in your savings. These positive reinforcements make it easier to maintain good habits.
By creating a detailed budget in QuickBooks Online and following these simple tips, you can gain a clear view of your finances and plan strategically for the future. Remember that a budget isn’t set in stone; it should grow and adapt alongside your business. Regularly review your budget, adjust as needed, and celebrate your progress. With a well-organized plan and the right tools in place, you’ll be better positioned to reach your financial goals and keep your business on track.
