How Deposits Work in QuickBooks Desktop
Recording payments, whether they come in for an invoice you sent to a customer (recorded via the receive payment feature) or you issued a sales receipts for an in person sale, you will have to deal with posting the deposit into QuickBooks.
Tip: If you need a refresher or direction on how to record a payment for an invoice or in person sale, check out our article How to Utilize Sales Receipts, Invoices, and Statements in QuickBooks Desktop
A Special Account
By default, QuickBooks posts payments received into an account called Undeposited Funds. You can see it in your Chart of Accounts by clicking the Chart of Accounts icon on QuickBooks home page and scrolling down a bit. Look over to the end of the line and you will see its current balance. This holds your payments until you record them as deposits and take your money to the bank.
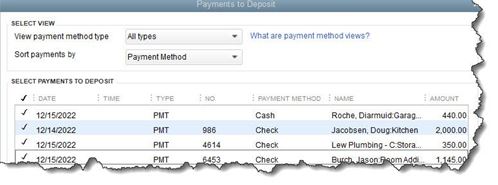
When you are getting ready to take cash and checks to the bank, click the Record Deposits icon on the home page. The Payments to Deposit window will open.

We recommend completing your physical deposit slip first; based on the checks and cash you have in hand. Then, match them to payments in the window pictured above. You can click in front of each one you have matched to create a checkmark. When you have finished, click OK. The Make Deposits window will open. Make sure that the account you want to Deposit to is showing in the upper left corner. You can add a Memo and change the Date if needed.
The total for your handwritten deposit slip and the final tally in the Make Deposits window should be the same. This will ensure that the amount deposited in your bank account will match the bank deposit amount in QuickBooks when reconciling. If you have leftover cash or checks, you will need to track down their origins and create new transactions.
Time Saver Tip: To save steps in recording payments in QuickBooks consider adding QuickBooks Payments to your offerings. You can send an invoice via email and offer ACH or credit card as payment options. Your customer will click on a button in your email to make a payment and QuickBooks will know it is linked to the invoice and post the payment to the appropriate invoice. Time saved on data entry! QuickBooks Payments has very affordable monthly rates of $0 – $19.95 and completive swipe and key rates. Reach out to us if you would like to learn more.
Checking Your Work
It is a good idea to check your Undeposited Funds account occasionally to make sure that you have not left money undeposited. To do this, open your Chart of Accounts. Right-click Undeposited Funds and click on QuickReport: Undeposited Funds. All should be selected in the Date field in the upper left. Click on Customize Report and select the Filters tab. Scroll down in the Filters list and click on Cleared. Select No and click OK to display your report.

Working with Payment Methods
QuickBooks comes with a default set of payment methods. You can add to these and/or make existing ones inactive, so they do not clutter up the drop-down list. Open the Lists menu and select Customer & Vendor Profile Lists | Payment Method List. If you do not accept, Discover cards, for example, right-click on that entry and select Make Payment Method Inactive. To add one, click the down arrow next to Payment Method and then New. The Payment Method should match the Payment Type.
Using the methods above will make reconciling your checking account at month end go more smoothly as all your deposits are accounted for and they match to your banking statement.
