How to Setup Late Fees in QuickBooks
Do you have aging receivables? Tardy receivables can have a negative impact on your cash flow.
We’ve discussed ways to encourage prompt payment in past columns. For example, you can start accepting credit/debit cards and direct bank transfers, (QuickBooks Payments) make sure invoices go out immediately after a sale, or offer a premium like a small one-time discount for paying on time 12 months in a row to name a few.
You can also assess finance charges on remittances that come in after the due date. QuickBooks provides the tools to allow this.
Setting It Up
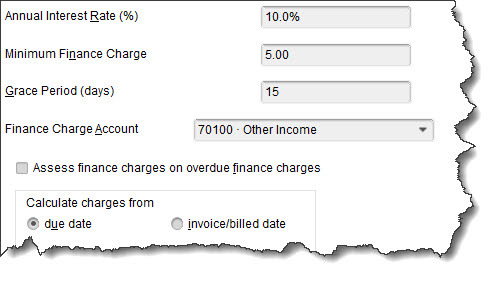
Before you start charging extra for late payments, you will need to do some setup work in QuickBooks. Open the Edit menu and select Preferences, then Finance Charge. Click the Company Preferences tab. You’ll see a window like this:

You will have to answer these questions and enter your responses in the window:
What will your Annual Interest Rate (%) be?
What will you set as a Minimum Finance Charge?
Will you allow a Grace Period? This is the number of days given to your customers to make their payments after the due date before finance charges kick in.
Where should captured finance charges go? We recommend setting up the Finance Charge Account as a Other Income account.
Do you want to Assess finance charges on overdue finance charges? Some jurisdictions don’t allow you to charge interest on overdue interest charges. If you want to do this, check on your local lending laws – specifically is there an amount limit that can be charged.
When will you start to Calculate charges? In this example, the due date is selected. So, QuickBooks will start to add finance charges 21 days after the stated due date. If you choose invoice/billed date, you’ll want to make your grace period longer. This can be rather a confusing concept. Contact us if you want a deeper explanation.
Assessing Finance Charges
QuickBooks offers two ways to notify customers about finance charges. You can’t include them on invoices, like you may be used to seeing on credit card bills. Rather, you have to print separate invoices that only contain the finance charges.
If you put a check in the box in front of Mark finance charge invoices “To be printed,” you can print them out separately. If you leave the box blank, the finance charges will appear on the customer’s next statement. Click OK when you’re done with this window.

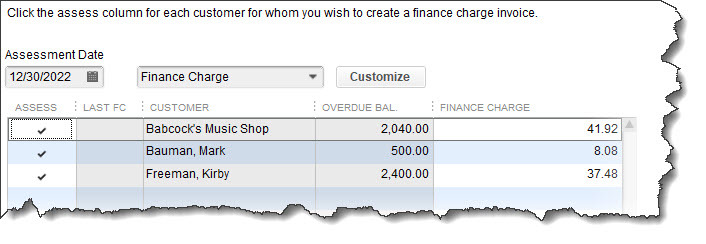
Open the Customers menu and select Assess Finance Charges. A window like the one in the image above will open. Make sure that the Assessment Date is the actual date you want to assess charges, which may not be the current date. Click in the Assess column to create a checkmark for every customer you want to charge. When you’re done, click Assess Charges.
When you’re ready to print finance charge invoices, open the File menu and select Print Forms | Invoices to open a window like this:

Considerations Beyond QuickBooks
Besides knowing whether you can charge finance charges on existing finance charges, there are other considerations. For example, does your state’s lending laws allow you to use the phrase “finance charge” or must you use a term such as “late fee?” When should you assess finance charges? Have you notified your customers of your intent to begin assessing finance charges? This is definitely something they should know in advance. You might need to add this to your customer message on invoices.
We can’t tell you whether finances charges are the path you should take to improve your cash flow as there are many issues to consider. However, we can help you with the mechanics of doing so and are here to answer any questions.
