Account Reconciliation in QuickBooks Desktop
The account reconciliation feature is an important tool to make sure banking and credit card/loan transactions are entered into QuickBooks.
We strongly recommend that you make account reconciliation a monthly habit. Doing so has numerous benefits:
- Have confidence that your bank balance in QuickBooks is accurate.
- Match payments to invoices.
- Make sure that your bill payments are entered.
- Catch errors sooner.
- Detect unauthorized access to your accounts.
Before you attempt a reconciliation using QuickBooks, there are actions you can take ahead of time to minimize the time required and make the process less frantic and frustrating. Here are some tips.
Match your bank/credit card accounts with QuickBooks accounts.
If you are new to QuickBooks and/or you have not set up accounts that mirror all of your bank and credit card accounts, you’ll need to do so. Here’s how:
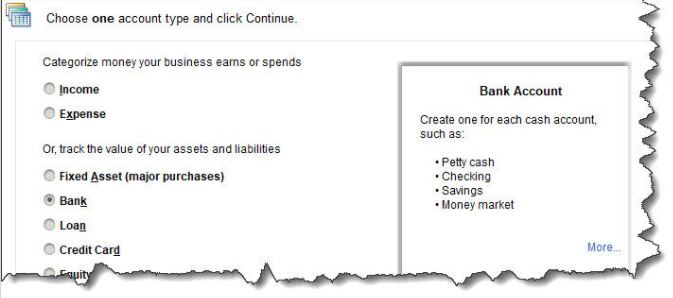
Open the Company menu and select Chart of Accounts. Click the down arrow next to Account in the lower left corner and select New. This window will open:

You are going to want to reconcile your checking account(s), so select Bank and click Continue. Complete the fields on the screen that opens and save the account.
Be sure that your QuickBooks transactions are up to date
If you have connected your QuickBooks file to your online bank, this will be easier. You will want to enter any cleared transactions from your statement that are missing in QuickBooks. If you have not set up a link to your financial institution, we recommend that you do so. Otherwise, you will have to sign on to your online bank account and locate each cleared transaction for each account. (We can help you with this step if you are unsure how).
The reconciliation process
Reconciling an account in QuickBooks is similar to the way you used to do it using a paper statement and your checkbook register. You will be matching the transactions from one to the other and clicking the ones that correspond. When you have finished, QuickBooks should show a $0.00 difference between the two.
This is the most difficult step in reconciling: ending up with a zero difference. If you don’t, begin to troubleshoot your deposits/checks and charges totals at the bottom of the reconciliation window to your totals on your bank statement. If both balances are off, you will have to go through each item to determine what is missing, entered twice or not entered correctly in QuickBooks. If you still cannot determine the difference, reach out to us for help.
Remember to enter interest earned and service fee amounts.

They will probably seem like small amounts, but your reconciliation will not work if you do not enter any interest earned or bank service charges. These fields will appear at the bottom of the window when you open the Banking menu and select Reconcile.
Once you have gone through a reconciliation successfully, the next ones should be easier. Doing it for the first time can be a challenge. We can help you through the process. If you would rather, we can even take over your reconciliation chores completely. We are here when you need us.
