Unlock Deeper Insights: How to Utilize Classes in QuickBooks Desktop
Class tracking in QuickBooks Desktop allows users to track financial information by business segments (locations, departments, programs, events, etc.). It also allows you to keep your chart of accounts simplified as you don’t need to duplicate elements of your chart of accounts to track multiple business segments.
To begin using the class tracking feature, you’ll first need to turn the feature on.
Turning on Class Tracking
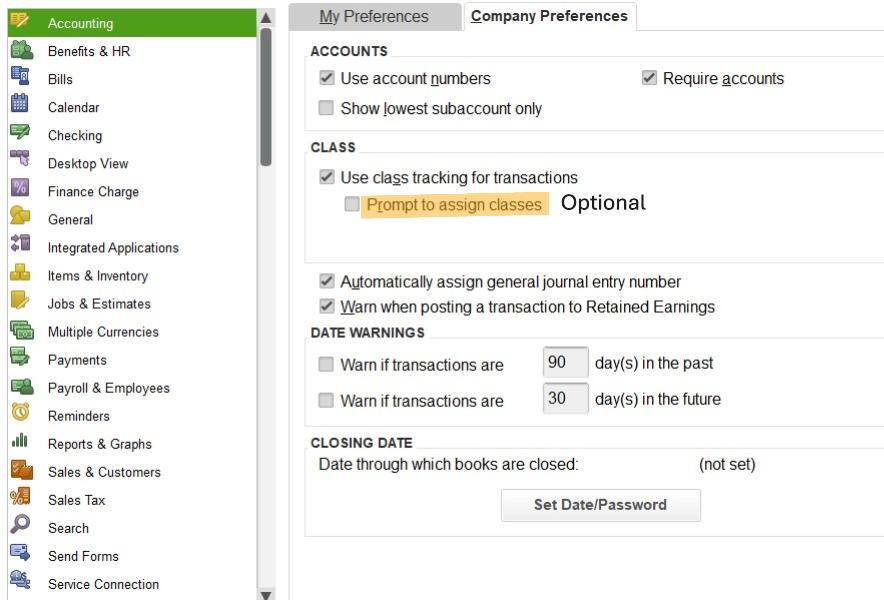
Click on the Edit menu at the top of the task bar. Select Preferences from the dropdown menu. In the Preferences window, choose Accounting from the list on the left, then select the Company Preferences tab at the top. Check the box next to Use class tracking for transactions.

If you’d like QuickBooks to remind you to assign a class every time you enter a transaction, also check Prompt to assign classes. We highly recommend turning this feature on.
Create the Class List
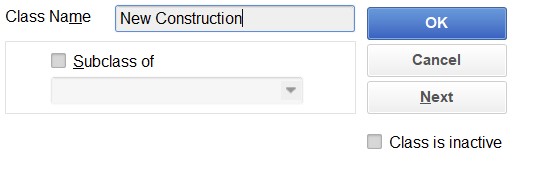
Go to the Lists menu at the top of the task bar and select Class List. In the new window, click on the Class button (usually in the lower left corner) and select New. Give your class a name. For example, if you’re tracking type of business, you might name your classes “New Construction,” “Remodel,” or “Overhead” Click OK to save.

Tip: The Subclass of provides an option to create a grouping of classes. This gives you the ability to organize your class data in greater detail as keeping the data easier to view when you run the class report. You will also have the ability to filter classes when running reports.
Assign Classes to Transactions
When you enter a transaction (like a bill, invoice, or check), you’ll see a field labeled Class. Select the appropriate class from the dropdown menu. You can also add a new class by typing in a new one or selecting <Add New> from the dropdown menu. You can also split the transaction to multiple classes within one transaction.

Class Reports
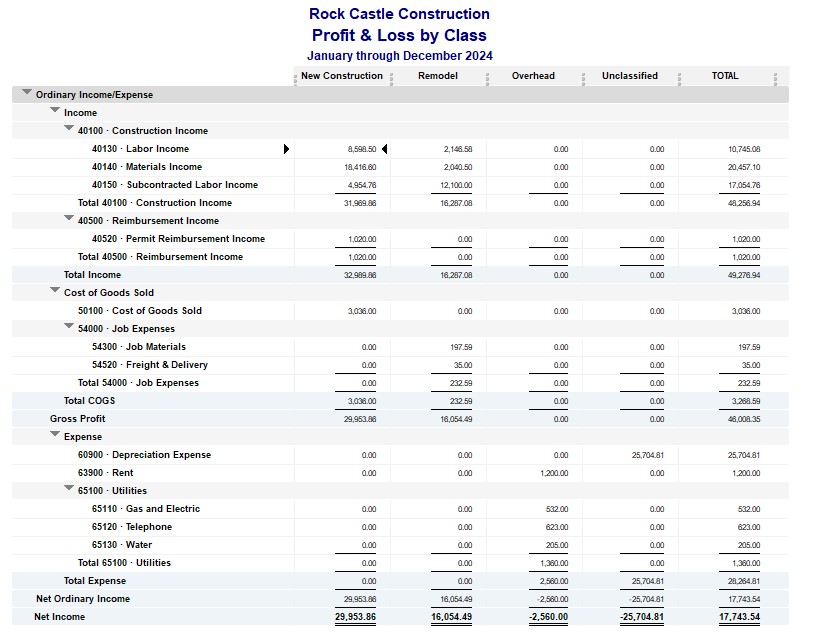
Once you start using classes, you can run reports to see how each class is doing. Go to the Reports menu, select Company & Financial, and then choose Profit & Loss by Class. The report provides a clear breakdown of income and expenses for each class, making it easier to review and use the information to make informed decisions.

Tip: Pay attention to the Unclassified column as these are transactions that have not been assigned to a class. Double click on the total for any account that shows a balance to see if anything needs to be assigned to a class. If you have activity that doesn’t require a class, we suggest setting up a generic class such as N/A so you don’t continue to review activity you have previously double-checked.
If you are consistent in using the class tracking feature, you’ll have a clearer picture of how different areas of your business are performing and can make decisions in a timelier manner.
