Your QuickBooks Online (QBO) dashboard is the first thing you see when you log in, so why not make it work for you? A well-organized dashboard helps you track key financial metrics, streamline workflows, and get quick insights into your business’s financial health. Whether you’re a small business owner, bookkeeper, or accountant, customizing your QBO dashboard can save time and reduce frustration. In this guide, we’ll walk you through the best ways to personalize your dashboard so you can access essential data quickly and improve efficiency.
Rearranging Dashboard Widgets
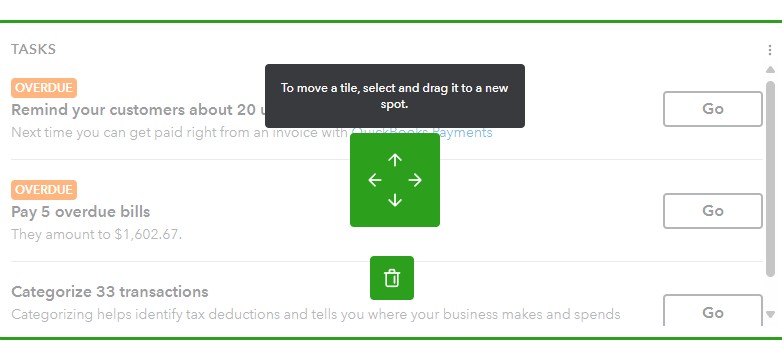
The widgets on your QBO dashboard provide an overview of your business’s financial status. You can adjust these to focus on what matters most to you.
How to move widgets:
Click on the Customize layout button
Hover over a widget, then click and drag it to your preferred position.
Drop it in place and repeat for other widgets as needed.
Click Save
Adding or Removing Widgets
Not all widgets are helpful for every business. You can customize which ones appear based on your workflow.
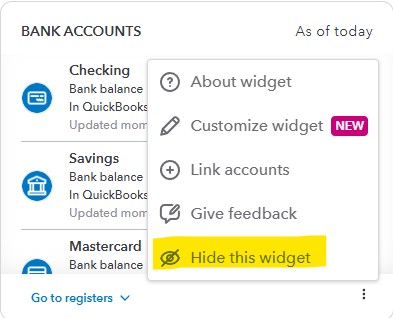
How to remove a widget:
Click the three-dot menu (⋮) in the top-right corner of the widget. (Sometimes you find them in the bottom corner as well)
Select Hide this widget if you don’t need it on your dashboard.
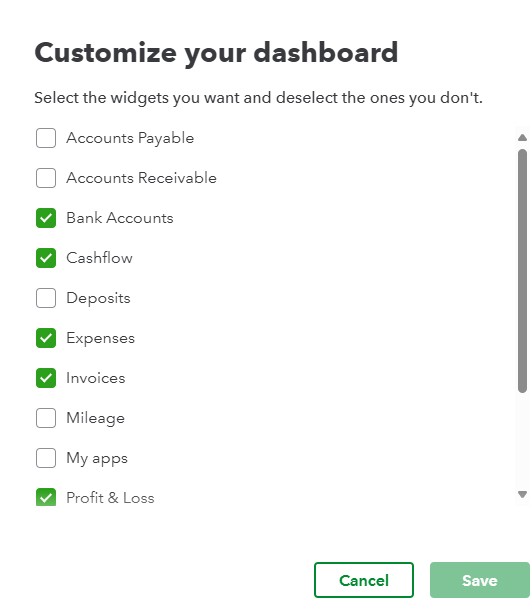
How to add a widget:
Click on the Customize layout button
Click the Add or remove widgets button
Select the widgets you want to add and click Save.
Adjusting Your Layout for Maximum Efficiency
Benefits of a Customized Dashboard
Small Business Owners: Instantly see outstanding invoices and cash flow so you always know where your business stands.
Bookkeepers: Quickly access transaction details and bank feeds for more efficient reconciliation.
Accountants: Keep tax deadlines, client reports, and financial health indicators front and center.
By customizing your dashboard to your needs, you eliminate clutter and focus on what matters most to you.
Tips for an Effective QBO Dashboard
Prioritize key metrics: Avoid information overload by keeping only essential widgets.
Regularly update your layout: Revisit your dashboard setup as your business needs change.
Utilize favorites: Pin the most frequently used reports to avoid extra clicks.
Final Thoughts
A well-customized QuickBooks Online dashboard puts the most critical financial data at your fingertips, making day-to-day financial management faster and easier. Take a few minutes today to adjust your dashboard and experience the benefits of a streamlined workflow.
Let’s be honest—QuickBooks Desktop is packed with reports. If you’ve ever scrolled through the Reports Center wondering which one to open, you’re not alone. But here’s the thing: sometimes, the standard reports don’t give you exactly what you’re looking for. That’s where custom reports come in.
They’re your chance to slice and dice your data in a way that means something to you and your business.
Why Custom Reports Are Worth It
Custom reports let you focus on the parts of your business that matter most—whether that’s tracking income by job, checking expenses by vendor, or comparing sales across departments.
Generic reports feel like one-size-fits-all. With custom reports, you get to shape the data to fit your business—kind of like choosing exactly what songs to play instead of listening to whatever’s on the radio. It’s your information, your way.
A Quick Example
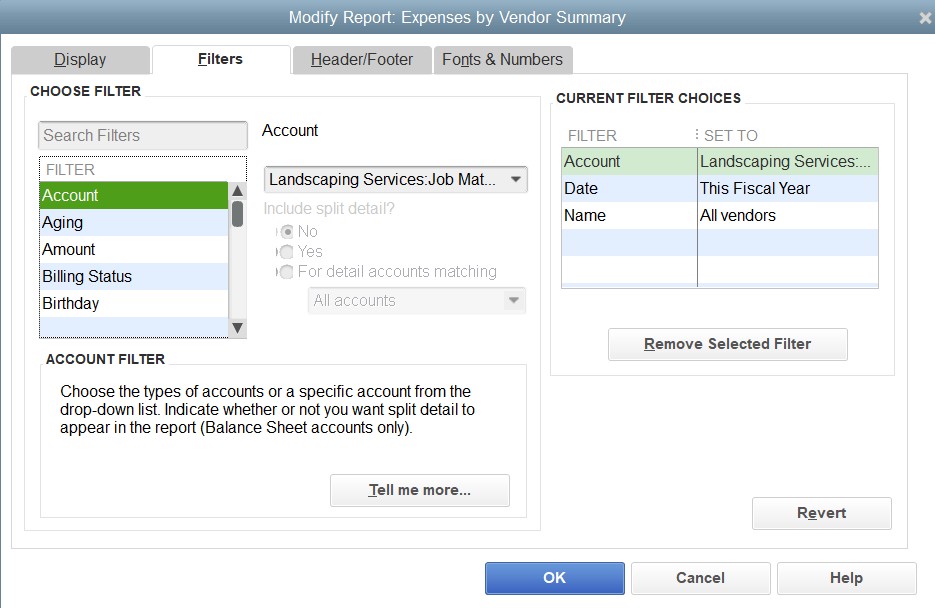
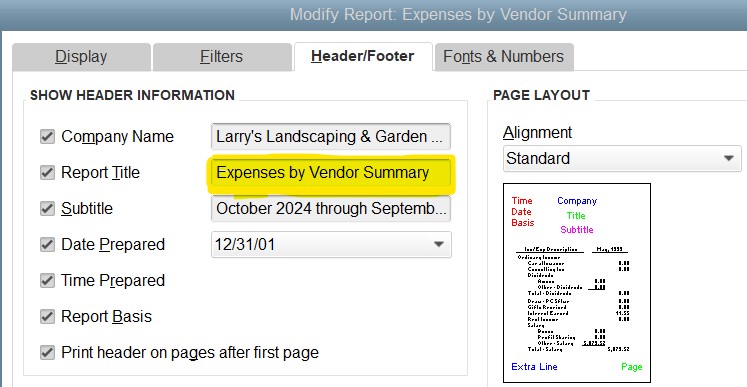
Let’s say you want to keep a closer eye on how much you spend with each vendor over time. You can start with a prebuilt report like the Expenses by Vendor Summary, then tweak it:
Add a date range that aligns with your budget review period
Filter by a specific account (maybe just job materials)
Sort by Total to see where most of your money’s going
Tip: You can also customize the report’s name by selecting the Header/Footer tab in the Customize Report window.
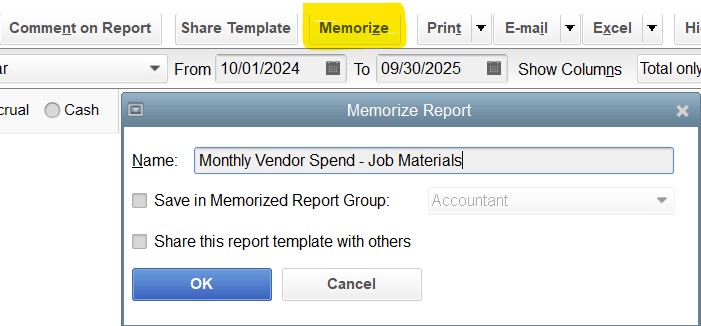
Once you like the way it looks, memorize it.
Name it something clear (like “Monthly Vendor Spend—Job Materials”), and it’ll be right there for next time. There’s no need to start from scratch.
Prefer to Create a Report from Scratch?
In QuickBooks Desktop, go to:
Reports in the top menu
Choose Custom Reports
Select Transaction Detail or Summary to begin
You can filter, sort, group, and format from there to your heart’s content.
One Last Tip
Once you’ve built a custom report that works, don’t keep it to yourself. Share it with your team or your bookkeeper so everyone’s on the same page. You can also export it to Excel if you like working with spreadsheets outside of QuickBooks.
Final Thought
Custom reports are one of the most underrated tools in QuickBooks Desktop. They help you stop guessing and start seeing the whole picture.
Do you have a favorite report you always customize? Let me know—I’d love to hear what’s working for you.
Creating a budget that works can be challenging. Income can be unpredictable, and expenses can be hard to estimate. However, a well-crafted budget is essential for running a successful business. By using QuickBooks Online’s budgeting tools and following the steps below, you’ll gain a clear picture of your finances and be able to make informed decisions throughout the year.
Creating Your Budget
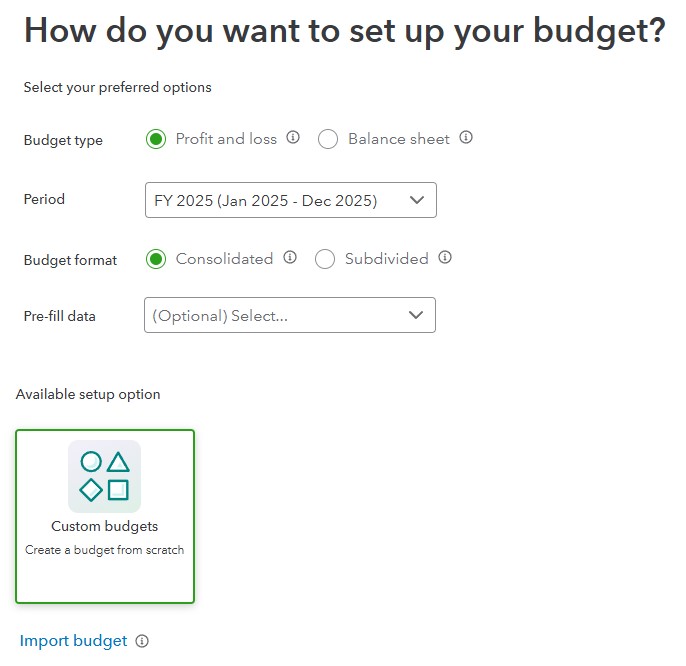
Click the gear icon in the upper right corner, then select Budgeting under Tools. Click Create budget. For Budget type, select Profit and Loss. This is most typical. It allows you to plan your budget around income and expenses over a specific time period.
***Note: you can also setup a budget for a Balance Sheet which can help you track your company’s assets, liabilities, and equity and plan for short- and long-term goals.
You’ll have to make other decisions about your new budget, such as:
Time period. We’re going to create our budget for the upcoming fiscal year that starts in Jan of 2025. So, we’ll select FY 2025 (Jan 2025 – Dec 2025).
What Budget format do you want to use? We’ll select Consolidated, since we want an organization-wide plan. A Subdivided budget would allow you to create individual budgets based on location, class, department, or customer.
Do you want QuickBooks Online to pre-fill data? If so, select the year of actual data you’d like to use from the drop-down menu.
Prefer to start from scratch? Select Custom budgets to manually enter your own data. This is especially helpful for new businesses with limited historical data or for companies revamping their finances.
Already have a budget outside QuickBooks?Use the Import budget option to bring in your budget from Excel or Google Sheets.
For this article, we will set up a budget from scratch.
QuickBooks helps you prepare the budget you want.
Click Next when you’re done. Your budget table will open.
Filling In Your Budget
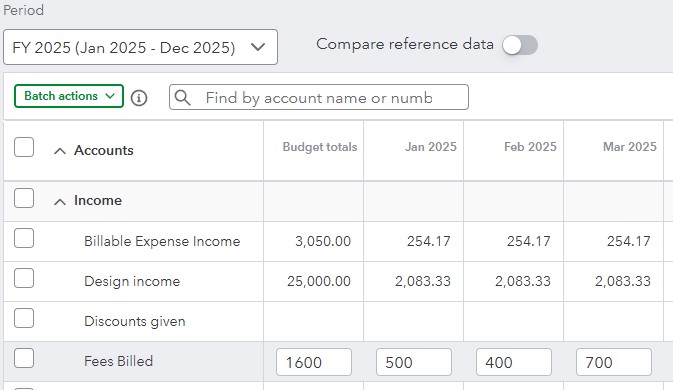
Before you start filling in your budget, make sure the information at the top of the page is accurate. Is the fiscal-year correct? The button in front of Compare reference data should be turned off, since we’re starting from scratch. If you have past budget data or a year’s worth of income and expenses that you want to bring in, make sure this option is turned on. QuickBooks Online will then ask you whether you want to transfer your Actuals (real money you received or spent) or your budget, and for what year.
Make sure the time span is set correctly for your initial work (Yearly, Quarterly, or Monthly), though you can switch back and forth among them without losing data. Click the gear icon in the upper right to see your options there. You can Autosave budget (recommended), Hide empty rows (you won’t want to do this until you have your budget set up), and make the Display density compact.
To create your budget, you simply enter numbers in the small boxes supplied. Columns are divided by months or quarters, depending on what you specified, and rows are labeled with budget items (Design Income, Fees Billed, Advertising, Legal & Professional Fees, etc.). You simply enter numbers in the boxes that apply. You can either:
Enter an annual total in the Budget totals box and let QuickBooks Online divide it into 12 monthly numbers (click the small “split” icon), or,
Put the monthly amount in the first month’s (or quarter’s) column, and QuickBooks Online will multiply it by 12 and enter the annual number (click the small arrow).
You can also enter different numbers in each box to reflect changing budget needs.
You can enter numbers manually in individual boxes or enter annual or monthly numbers. QuickBooks Online will divide or total them.
When you’re done working with your budget, save it. You can come back anytime and make adjustments as needed.
Budgeting Tips
Remember seasonal upswings and downswings.
Make your goals as realistic as possible and distinguish between essential and non-essential expenses. Enter your budget items for the bills and other expenses that must be covered before you add optional categories.
Keep it simple. Don’t budget down to the last paper clip. You risk budget burnout.
Build in some backup funding. Just as you’re supposed to have an emergency fund in your personal life, try to create one for your business.
Plan for Periodic Expenses like annual insurance premiums, property taxes, or holiday gifts can catch you off guard. Estimate these costs and set aside money each month so you’re prepared.
Overestimate your expenses, at least a little. This can help prevent “borrowing” from one budget category to make up for a shortfall in another.
Make your employees part of the process. You shouldn’t be secretive about the expense element of your budget. Try to get input from staff in areas where they have knowledge.
Revisit your budget frequently. You should evaluate your progress at least once a month. You’ll learn a lot about your spending and sales patterns that you can use for future periods. The Budget Overview report displays all of the data in your budget(s). Budget vs. Actuals shows you how you’re adhering to your budget.
If you’re feeling unsure, working with an accounting professional can provide clarity. They can help you fine-tune your budget, offer insights into tax strategies, and suggest ways to make your money work more efficiently.
Staying motivated can be tough so make sure you reward yourself and celebrate small victories along the way, like paying off a credit card or hitting a milestone in your savings. These positive reinforcements make it easier to maintain good habits.
By creating a detailed budget in QuickBooks Online and following these simple tips, you can gain a clear view of your finances and plan strategically for the future. Remember that a budget isn’t set in stone; it should grow and adapt alongside your business. Regularly review your budget, adjust as needed, and celebrate your progress. With a well-organized plan and the right tools in place, you’ll be better positioned to reach your financial goals and keep your business on track.
If you’re still manually entering your banking and credit card activity into QuickBooks Online, we suggest you consider setting up connections to your online bank and credit card accounts. Once your transactions are delivered to QuickBooks Online, the site provides tools that allow you to view them and make sure they’re complete before you record them.
Here are step-by-step instructions to how this all works.
Making a Connection
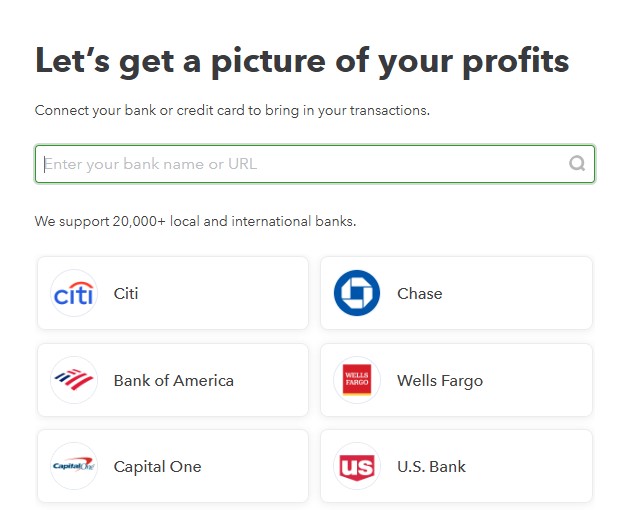
In order to do this, you’ll need to have set up a username and password for your online bank/credit card accounts. In QuickBooks Online, click Transactions | Bank transactions. Click Link account over to the right.
A page opens with suggested financial institutions. If yours isn’t there, enter it in the search field at the top. If there are multiple options, be sure to select the correct one and click it.
If your bank isn’t listed on the page of options, enter its name, and then click on the correct one if there’s more than one entry.
Click Continue and go through any of the security steps your financial institution may have. You’ll get to a page that says, Which accounts do you want to connect? A drop-down list displaying options from your Chart of Accounts will appear. Select the type of account you’re creating (checking, credit card, etc.) and continue to follow the onscreen instructions until your connection is complete and QuickBooks Online has downloaded your transactions.
WARNING: It’s important that you set up your linked accounts correctly since you’re dealing with the Chart of Accounts. If any step is confusing, we can schedule a session to go over online account connections with you.
Bank Transactions Page (Feed)
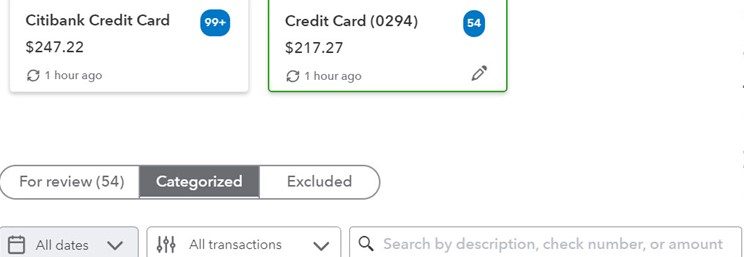
Once you’ve connected to all your online accounts, you’ll see that they appear on the Bank transactions page, displayed in small boxes containing their balances and the number of transactions they contain (there might be quite a few when you first download). You can also see how recently each account was updated (click Update anytime you want to refresh an account).
Once you’ve connected to an online bank account, you can see how many transactions were downloaded and what its balance is.
Click one, and its register will appear below. Above that, you’ll see three labeled bars:
For review. QuickBooks Online puts all downloaded transactions in this list.
Categorized. Your transactions will move to this list after you’ve assigned categories to them.
Excluded. If you happen to run into duplicate transactions, you can move them here.
Below that, you’ll see that you can filter your transactions by date, by type, or by description, check number, or amount.
WARNING: As you continue to work with accounts, you may occasionally find that a connection has been unlinked. When that happens, just repeat the connection process again.
Working with Individual Transactions
You’ll want to set some time aside the first time you download transactions so you can look at each one and add or edit its content. Click one to open the detail box, as shown below. The top line defaults to Categorize. First, select the correct Vendor/Customer (or + Add new), then check the Category and change it from the drop-down menu if it’s incorrect.
You can add or edit a lot of details for your individual transactions.
There’s one more field here that’s very important. If you’re purchased something on behalf of a customer, be sure to select the correct one from the drop-down list under the Customer field and click the Billable box. QuickBooks Online will make this transaction information available to you the next time you invoice the customer. Other fields in the above image are optional, like Tags, Memo, and Add attachment. When your transaction is complete, click Confirm to move it to the Categorized list. The transaction is now posted in QuickBooks.
There are two other options in these individual transaction boxes besides Categorize: Find match and Record as transfer.
Categorize: Find Match
When you use “Find Match,” QuickBooks is looking for a transaction that’s already been entered in your records, such as an invoice you’ve received payment for or a bill you’ve paid.
For example:
Let’s say a customer paid you $500, and you already entered that payment as “Received Payment” in QuickBooks.
When the $500 deposit shows up in your bank feed, you use Find Match to connect that bank transaction to the existing record in QuickBooks.
Record as Transfer
The “Record as Transfer” option is used when you’ve moved money between your own bank accounts, like from your checking account to your savings account.
For example:
If you transferred $1,000 from your business checking to your business savings account, you wouldn’t categorize it as income or expense—it’s just moving money within your accounts.
In this case, you use Record as Transfer to note that the transaction isn’t new; it’s just moving money between accounts.
Why These Options Matter
Find Match ensures your books match what’s in the bank without creating duplicate entries.
Record as Transfer keeps things clean and avoids accidentally categorizing your own money movements as income or expenses.
Setting up and using the bank transaction feed can feel overwhelming at first, but with practice, you’ll become more comfortable over time. If you’re feeling unsure, don’t hesitate to reach out to us for assistance. We’re here to help you set it up and guide you through the learning process to ensure you’re on the right track.
Class tracking in QuickBooks Desktop allows users to track financial information by business segments (locations, departments, programs, events, etc.). It also allows you to keep your chart of accounts simplified as you don’t need to duplicate elements of your chart of accounts to track multiple business segments.
To begin using the class tracking feature, you’ll first need to turn the feature on.
Turning on Class Tracking
Click on the Edit menu at the top of the task bar. Select Preferences from the dropdown menu. In the Preferences window, choose Accounting from the list on the left, then select the Company Preferences tab at the top. Check the box next to Use class tracking for transactions.
If you’d like QuickBooks to remind you to assign a class every time you enter a transaction, also check Prompt to assign classes. We highly recommend turning this feature on.
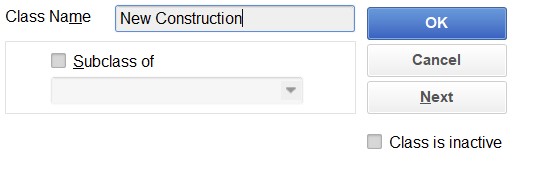
Create the Class List
Go to the Lists menu at the top of the task bar and select Class List. In the new window, click on the Class button (usually in the lower left corner) and select New. Give your class a name. For example, if you’re tracking type of business, you might name your classes “New Construction,” “Remodel,” or “Overhead” Click OK to save.
Tip:The Subclass of provides an option to create a grouping of classes. This gives you the ability to organize your class data in greater detail as keeping the data easier to view when you run the class report. You will also have the ability to filter classes when running reports.
Assign Classes to Transactions
When you enter a transaction (like a bill, invoice, or check), you’ll see a field labeled Class. Select the appropriate class from the dropdown menu. You can also add a new class by typing in a new one or selecting <Add New> from the dropdown menu. You can also split the transaction to multiple classes within one transaction.
Class Reports
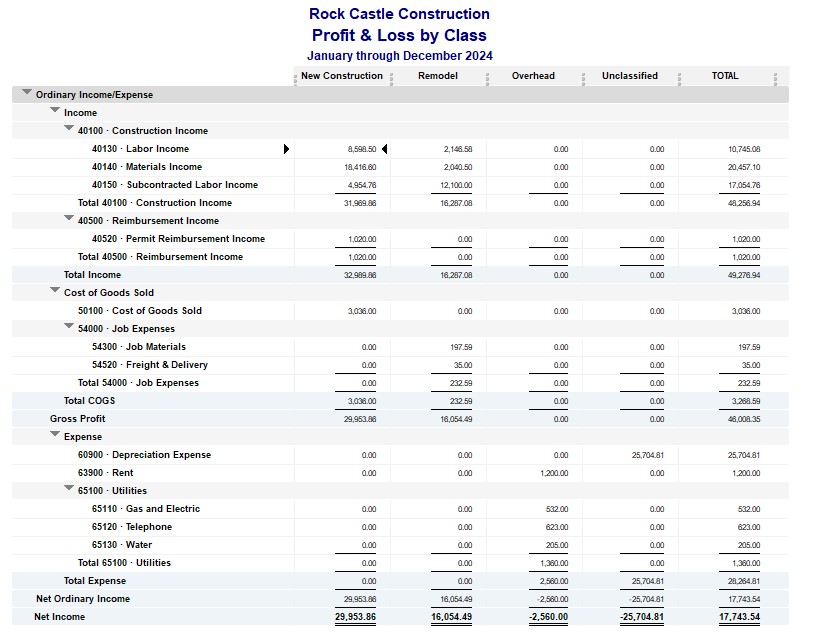
Once you start using classes, you can run reports to see how each class is doing. Go to the Reports menu, select Company & Financial, and then choose Profit & Loss by Class. The report provides a clear breakdown of income and expenses for each class, making it easier to review and use the information to make informed decisions.
Tip: Pay attention to the Unclassified column as these are transactions that have not been assigned to a class. Double click on the total for any account that shows a balance to see if anything needs to be assigned to a class. If you have activity that doesn’t require a class, we suggest setting up a generic class such as N/A so you don’t continue to review activity you have previously double-checked.
If you are consistent in using the class tracking feature, you’ll have a clearer picture of how different areas of your business are performing and can make decisions in a timelier manner.