Utilize Invoice Reminders in QuickBooks Online for Improved Cash Flow
Managing unpaid invoices is often one of the least enjoyable tasks when running a business. While no one likes reaching out to customers for overdue payments, failing to do so can negatively impact your cash flow.
Setting up automated email reminders in QuickBooks Online can help streamline the process. Not only will it reduce the stress of chasing overdue payments, but it also saves you valuable time—both by easing your concerns and eliminating the need for manual follow-ups. Here’s how to set it up.
A Simple Process
Setting up automated reminders is straightforward. The trickiest parts are deciding on the timing of the reminders and crafting the right tone for your emails.
Start by clicking the gear icon in the upper-right corner. Select Account and Settings under Your Company menu. Scroll down to the Sales tab and click on it. Next, scroll to the Reminders section. If the Automate Invoice Reminders option is off, click it to turn it on.
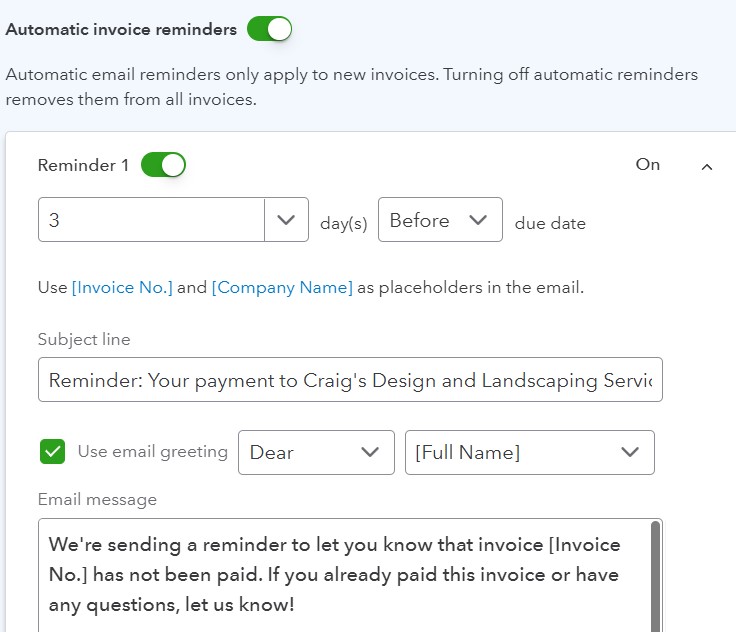
QuickBooks Online allows you to set up to three different reminders for various time periods. Click the down arrow on the Reminder 1 line:

QuickBooks Online allows you to customize your invoice reminders in a number of ways.
Three Different Reminders
QuickBooks Online offers three reminder options, each labeled with a suggested timing: before the due date, on the due date, and after the due date. However, you don’t have to follow this suggested schedule. For the first and third reminders, you can specify how many days before, on, or after the due date the email should be sent. You can only set the second reminder to send on or after the due date. If you prefer, you can set all reminders to send after the due date, which is a common approach.
Customizing Your Email Messages
You can customize the email greeting (e.g., “Dear”) and choose how the recipient should be addressed—by their full name, first name, or company name. You can also modify the subject line to suit your needs.
Below the greeting and subject line, you’ll find the email message that QuickBooks Online will send to the customer. QuickBooks Online provides a standard message, but you have the option to edit it completely or just adjust parts of it.
Preparing Your Email Messages
You’ll notice that fields like Invoice No. and Company Name appear in brackets ([]). If you’ve used mail merge before, you’re already familiar with this concept. If not, simply put, data in brackets will automatically be replaced with real information from your QuickBooks Online file. For example, if you’re sending a reminder to Cookies by Cathy, the company name will replace the placeholder text, and the correct invoice number will appear in that field.
You’ll want to tailor your message for each reminder based on when it’s being sent. For example, the tone should be firmer if the payment is 30 or more days late compared to just seven days late. For your first reminder, consider giving your customer the benefit of the doubt—they may have simply overlooked the invoice or missed the due date.
Once you’ve set up your reminders, remember to click Save. Note that automatic email reminders only apply to new invoices. However, you can modify or turn off reminders at any time. If you need to send a reminder to a customer about an existing invoice, hover your mouse over Sales in the toolbar and click Invoices. Then, click the down arrow in the Action column next to the relevant invoice and select Send Reminder.
Take Control of Your Collections with Automated Reminders
By setting up automated reminders in QuickBooks Online, you can ensure that your invoicing process runs more smoothly and efficiently. Take advantage of this feature and make overdue invoices one less thing to worry about.
