As you are going about your day, it is easy to be pulled in multiple directions. Having a regular bookkeeping routine can help you stay on track.
Here are some best practices when using QuickBooks Online.
Go through your new transactions regularly
One of the best things about QuickBooks Online is its ability to connect to your bank and credit card accounts and import transactions regularly. However, this feature is only useful if you review your recently downloaded transactions regularly. We recommend a minimum of once a week as it might become overwhelming if you wait much longer than that.
To view an account register, click Banking in the left vertical pane, and then click on the desired account at the top of the screen. Select a transaction and a small window like the (partial) one pictured above, displays your options.
Always assign categories to expenses
Entering detail information in QuickBooks Online will produce helpful your reports. It is especially important that you assign categories to expenses and mark them as billable or not. Those categorized expenses will be very important as you are preparing your company’s income taxes and ensures customers are invoiced for expenses you incur on their behalf.
Run aging reports on a weekly basis
QuickBooks Online can help you keep up with money owed to you as well as what you owe to others.
We recommend you run at least two reports weekly: Accounts Receivable Aging Summary and Accounts Payable Aging Summary. You can modify these reports by clicking the Customize button if needed, but they should be good as is. You do not want to see any numbers in any columns except the first one (Current). If you see any beyond that, it means that either incoming or outgoing payments are overdue. Click on any number to see the transaction(s) detail.
Set reorder points on inventory items
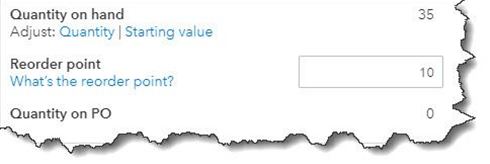
Keep an eye on your product inventory levels. When you create an item record (Sales | Products and Services | New), be sure to enter a Reorder point. The Products and Services page tells you how many items have Low Stock or are Out of Stock. You can also see the Qty on Hand and Reorder Point in the table below those numbers.
More to Implement
We also recommend other best practices and we will expand upon those in a later article but for now, believe these are a good starting point.
New year, new challenges, and the potential for new successes. Here are five ways you can improve your financial management in the new year.
If you are already using QuickBooks Online, you know how it has solved the paperwork confusion of the past. However, are you taking advantage of all of its capabilities? As you turn your digital calendar to January, consider expanding your use of the software to set yourself up for success in the upcoming year. Here are five features to explore if you have not already.
Practice Proactive Reconciliation:
QuickBooks Online Banking screen display registers for the bank and credit card transactions that have been posted by your banks. Do you review these regularly? It will save time when you do your monthly reconciliations with your bank statements. Hover over Transactions in the toolbar and select Banking. You can see some of your transaction management options in the image below.
When your statement comes and you are ready to reconcile, you can use QuickBooks Online tools that take you step by step through the process. Hover over Accounting in the toolbar and select Reconcile. Let us know if you need help with reconciliation or with managing downloaded transactions.
Start Accepting Online Payments:
This is probably the #1 way to encourage customers to pay you faster. When you set up a merchant account through QuickBooks Payments, you are be able to accept credit cards, debit cards, and ACH bank transfers. Your invoices will include a Pay Now button and will contain the information your customers need to pay electronically. Their funds will go into your bank account.
There are other ways they can pay you directly. You can take their card numbers over the phone. You can also get a free card reader from Intuit and swipe their cards on your mobile device. And you can set up recurring payments that will occur automatically.
Tip: We work directly with Intuit to offer QuickBooks Payments. Intuithas very affordable monthly rates and completive swipe and key rates. Adding QuickBooks Payments to your offerings can save steps in recording payments in QuickBooks. You send an invoice via email and offer ACH or credit card as payment options. Your customer will click on a button in your email to make a payment and QuickBooks will know which invoice it is for and QuickBooks and will link the payment to the appropriate invoice.
Set Weekly and Monthly Report Schedules:
You may run reports in QuickBooks Online on a monthly basis. Some reports, though, should be created more frequently, like Accounts receivable aging (detail or summary), Accounts Payable Aging, Open invoices, and Unpaid Bills. These reports help you keep a close watch on what you owe and who owes you.
It is important to run some other reports on a monthly basis, including Balance Sheet, Profit and Loss, and Statement of Cash Flows. Rather than just providing snapshots of where you stand with money coming in and going out, they give you a more comprehensive view of your finances that can help you make better business decisions. They are complex and often difficult to analyze, though, which is why QuickBooks Online categorizes them as For my accountant. While they are categorize under the Accountant group we recommend you view them at least monthly and if you need help interpreting them let us know.
Expand QuickBooks Online Features by Using Apps:
QuickBooks Online is generic enough that it can be used by a wide variety of small businesses. But that flexibility may mean that, it is not quite robust enough in one area or another, like inventory management or time tracking. Check out the hundreds of apps that can integrate with QuickBooks Online to fill in the gaps by clicking on APPs in the toolbar. Again, we are available to help if you need assistance in choosing the right app for your business.
Evaluate the Cost-effectiveness of Your Vendors:
It is easy to stick with the same old suppliers because it is a hassle to change. However, it is good to review the pricing of your current vendors and compare to other vendors to make sure you are getting the best pricing as well as customer service. To review your vendor list, hover over Expenses in the toolbar and click on Vendors. As you are reviewing the list, this might be a good time to clean up dated information. Click the down arrow at the end of each row and select Make inactive if you haven’t ordered from specific suppliers over the last year.
As we said earlier, we are available to meet with you and explain any of the concepts discussed here in more depth. Best wishes to you in the new year!
Keeping a watch on your accounts receivable can help improve cash flow. Knowing how many of your invoices are unpaid and if you billed all of the time and expenses for your customers projects impacts your cash flow.
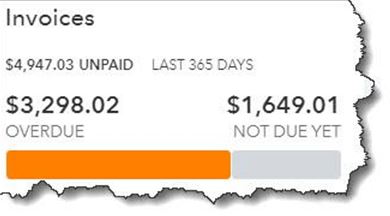
To get a quick glance of your customer balances, on the home screen hover over the Sales tab on the left vertical panel and click Overview. The dashboard shows the amount overdue as well as invoices open but not yet due. Click on the colored bar labeled OVERDUE, and you will see a list of invoices with the overdue ones at the top followed by open invoices not yet due.
While this quick glance is helpful, it is only a summary of what is owed to you. To get a full picture you can access accounts receivable reports by clicking Reports in the left vertical pane and scroll down to the heading labeled Who owes you
These reports are listed in two columns. Each has the outline of a star next to it. Click on the star, and the report will be added to the Favorites list at the top of the page. Click on the three vertical dots next to it, and you will be able to Customize the report. Hover over the title and you will see a small, circled question mark. Click on this to get a brief description of the report.
There are several reports in this list that can provide insight into where your outstanding revenue is. We recommend you run five of them at least once a week – more frequently if your business sells large quantities of products and/or services. The suggested reports are:
Accounts receivable aging detail
This report provides a list of invoices that are overdue, along with aging information. There are several columns in the report, but you will want to pay special attention to the last one: OPEN BALANCE.
Customizing the Reports
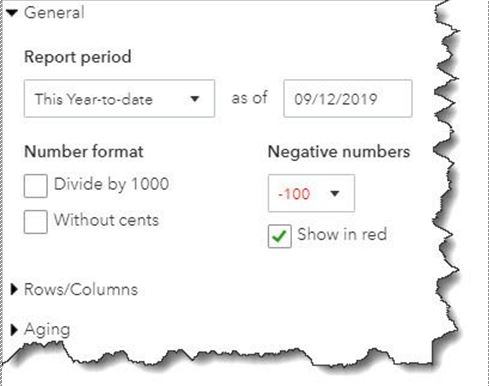
Before you run the report, you can explore the customization tools provided for it. They will not be the same for every report, but you can start to get an idea of what can be done. Hover over the report title and click Customize. A panel like the one pictured below will slide out of the right side of the screen.
You can see some of your customization options in the image above. Beyond these, you can also work with filters and headers/footers. When you are satisfied with your changes, click Run report.
If you want to run a report with its default settings, just click on the report title in the list to display it.
Four other reports you should be generating regularly are:
Customer Balance Summary: Shows you how much each customer owes your business
Open Invoices: Lists invoices for which there has been no payment
Unbilled Charges: Just what it sounds like: tells you who hasn’t been invoiced yet for billable charges
Unbilled Time: Lists all billable time not yet invoiced
Utilizing the customer reports will help keep track of what is coming due and track expenses and time to bill your customers. All items that affect your cash flow and company’s financial health.
If any part of your work involves driving business miles that can be deducted on your income taxes, you will want to know about a QuickBooks Online feature: mileage tracking. You can record trips either manually or automatically, and the software will calculate your deductions. Here is how it works.
Tracking Trips Manually
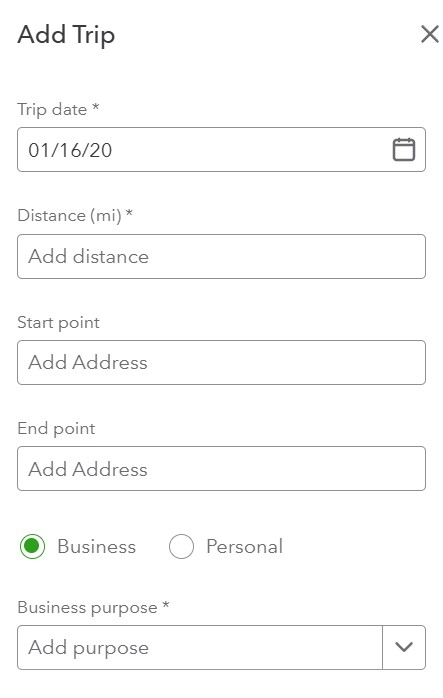
Before you get started, you will want to create a record for the vehicle you will be using. Click Mileage in the navigation toolbar. Hover over the green Add trip button in the middle right of the screen, and click ViewVehicles. Click Add vehicle and complete the fields on the screen that opens. Click Save. Back on the main screen, click directly on Add trip. The New trip panel will slide out from the right.
Enter the Date, then the number of miles driven (Distance). If you would like, you can enter the Starting point and Ending point for your records. Click either the Business or Personal icon and enter a Description. Select the correct Vehicle if you use more than one and click Save. Your trip will now appear on the main screen with your tax deduction already calculated, as pictured below. Click the More button at the end of the row, and you will be able to Edit your trips and Duplicate them.
Auto-Track Miles
There is another way to track your trips, one that does not involve writing down your odometer readings or mileage. The QuickBooks Online mobile app will automatically track your miles as you drive.
To set this up, open the app and click on the three horizontal lines in the lower right to open the app’s navigation shortcuts. Then click the Mileage icon. Auto-tracking is off by default, so you’ll have to click OFF to open the Mileage settings screen. Click the Auto-tracking button to change it from grayed-out to green. In the small window that opens, click Settings to go to the QuickBooks section of your phone’s Settings screen and make these changes:
Location must be Always On.
Motion & Fitness must be On.
Background App Refresh must be On.
Cellular Data must be On.
Close this screen and return to the QuickBooks Online app’s main Mileage screen after you have changed your settings. Auto tracking should be ON. Click the + (plus) sign in the lower right, and then Create trip. The app will automatically detect your starting and stopping locations using your phone’s GPS. When you have arrived at your destination, open the Mileage app again.
Swipe left on the trip’s record to categorize it as business and right to mark it personal. Enter the trip’s purpose if it is a business trip and click Save. You will now need to turn off Auto-tracking and reverse the changes you made in your phone’s Settings (unless, of course, you normally leave any of them on).
We encourage you to have a discussion with your tax preparer to make sure the mileage deduction is best for your business and you are capturing all the tax deductions allowed.
QuickBooks Online offers several ways to receive payment on an invoice, documenting an instant sale, or selling on the road.
Delayed Payments
Do you send invoices for products and/or services? If so, there’s multiple ways to record payments when they come in. You can, of course, just open the invoice and click Receive payment in the upper right corner. We find, though, that going to the All Sales screen gives us a chance to check the status of other pending transactions. Click Sales in the toolbar, then All Sales.
If your list isn’t very long, you can just look for the invoice number. You can also use the Filter tool to find the original form. Click the down arrow next to Filter in the upper left to see your search options here (Status, Customer, etc.).
Once you have found the invoice, look down toward the end of that row. In the Action column, you will see Receive payment. Once the Receive Payment window opens, select the Payment method that applies. Leave the Deposit to field showing Undeposited Funds and look over the rest of the screen to make sure everything is accurate. Print it if you would like and/or add an Attachment using the links at the bottom, then Save it.
Tip: Customers tend to pay invoices faster if you allow them to make payments online. If you are not yet set up for this, we can help you.
Instant Payments
Your business may collect payments at the time you provide a product or service. When this happens, you will want to supply your customers with a sales receipt instead of an invoice (this is also important for your own records). Click the +New button in the upper left and select Sales receipt under Customers to open a blank form. You will fill this out just like an invoice, by selecting the Customer first, then entering or selecting any data needed for the other fields.
If you do not anticipate needing all of the fields on your sales forms, you can remove some of them and even add your own.
When you have completed all of the fields in your sales receipt, you can preview and print it. You can also save and email it to the customer.
Going Mobile
If you generate sales on the road, you can still create sales receipts for customers using the QuickBooks mobile app. Just click the plus (+) sign at the bottom of the screen and select Sales Receipt. The form is similar to the one you would use on your desktop computer, though the layout is different.
Having a QuickBooks Payments account is especially helpful when you are making mobile sales. You can even swipe your customers’ credit and debit cards if you have a card reader.
Therefore, whether you are receiving payment on an invoice, documenting an instant sale, or selling on the road – QuickBooks Online provides some great tools for receiving customer payments.